Berikut adalah perintah-perintah pada Command Prompt yang berhubungan dengan jaringan komputer.
Untuk melakukan perintah-perintah tersebut Anda harus masuk ke Command Prompt ( Klik Start ->Run ->Ketik CMD )
1. ipconfig /all
Menampilkan informasi konfigurasi koneksi, misalnya Host Name, Primary DNS Type, Ethernet Adapter LAN.
2. ipconfig /flushdns
Menghapus DNS Cache
3. ipconfig /release
“Menghapus” semua koneksi IP Address.
4. ipconfig /renew
Membuat IP Address baru untuk adapter tertentu.
5. ipconfig /displaydns
Menampilkan DNS Cache.
6. ipconfig /registerdns
Melakukan refresh DNS dan meregister kembali koneksi DNS.
7. ipconfig /showclassid
Menampilkan informasi DHCP Class.
8. ipconfig /setclassid
Mengubah DHCP Class ID
9. control netconnections
Menampilkan Network Connection.
10. nslookup
Mengetahui alamat ip address dari nama domain yang di tuliskan
11. netstat
Menampilkan informasi koneksi TCP/IP yang sedang aktif.
12. route
Menampilkan local route.
13. hostname
Menampilkan nama komputer.
14. ping
Contoh: ping www.finderonly.com
Melakukan test koneksi ke situs www.finderonly.com.
Semakin sedikit % loss-nya maka semakin baik koneksinya.
15. tracert
Menampilkan informasi IP Address route.
Senin, 19 April 2010
Merubah Tampilan System Properties Windows XP
System Properties berisi info-info tentang komputer anda, anda dapat melihatnya di Control Panel –> System atau klik kanan icon My Computer dan pilih properties. Tetapi anda bisa merubah tampilan tersebut jika anda menginginkannya. Berikut contoh preview perubahan tersebut
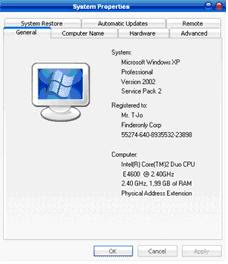

Anda bisa merubah tampilan System Properties tersebut dengan mengikuti langkah-langkah sebagai berikut :
1. Buatlah file dengan nama oeminfo.ini dengan isi sbb :
[Support Information]
Line1=Ketik Info anda disini
Line2=Ketik Info anda disini
Line3=Ketik Info anda disini
Line4=Ketik Info anda disini
Line5=Ketik Info anda disini
[general]
Manufacturer=Dibuat oleh Finderonly
Model=Model Finderonly 1.0
2. Simpan file oeminfo.ini tersebut ke direktori C:\WINDOWS\system32\
3. Pilihkan sebuah gambar (extention *.bmp dengan resolusi tidak terlalu besar) yang ingin anda tampilkan di System Properties dan beri nama oemlogo.bmp lalu simpan ke direktori C:\WINDOWS\system32\
4. Sekarang anda bisa lihat perubahan tersebut.
Semoga Bermanfaat
Melihat IP Address Pengirim Email Anda
Berikut saya memberikan sebuah tutorial bagaimana anda bisa melihat IP Address dan info detail pengirim email anda.
Untuk Yahoo Mail.
1. Login ke account email anda ( http://mail.yahoo.com/ ).
2. Masuk ke inbox dan buka salah satu email yang ingin anda lihat.
3. Pada pojok kanan bawah cari menu tulisan “Full Headers” dan klik tulisan tersebut.
4. Maka anda bisa mengetahui ip address pengirim email dan info detail yang lain.
Untuk Gmail / Google Mail.
1. Login ke account email anda ( http://gmail.com/ ).
2. Masuk ke inbox
3. Buka salah satu email yang ingin anda lihat,
4. Lihat kanan di bagian atas ada pilihan Reply, terus disamping tulisan Reply ada tanda panah ke bawah, klik tanda panah tersebut dan pilih Show Original.
5. Maka anda bisa mengetahui ip address pengirim email dan info detail yang lain.
Untuk Hotmail.
1. Login ke account email anda ( http://hotmail.com/ ).
2. Buka salah satu email yang ingin anda lihat
3. Klik kanan email tersebut dan pilih View Source.
4. Maka anda bisa mengetahui ip address pengirim email dan info detail yang lain.
Untuk Outlook Express.
1. Buka program Outlook Express dan login ke email anda.
2. Klik kanan pada salah satu email yang ingin anda lihat.
3. Klik menu Properties.
4. Klik tab Detail.
5. Maka anda bisa mengetahui ip address pengirim email dan info detail yang lain.
Untuk Microsoft Outlook.
1. Buka program Outlook Express dan login ke email anda.
2. Klik kanan pada salah satu email yang ingin anda lihat dan pilih Options
3. Maka anda bisa mengetahui ip address pengirim email dan info detail yang lain.
Kumpulan Situs Untuk Submit Web Gratis
Jika anda punya web atau blog yang sepi pengunjung, anda bisa mencoba mendaftarkan web/blog anda di submit Search Engine atau direktori.
Terdapat banyak situs di internet yang menyediakan fasilitas submit untuk web/blog, tetapi kebanyakan layanan tersebut mengharuskan kita untuk membayar.
Disini saya mempunyai beberapa kumpulan situs yang menyediakan submit untuk web/blog anda secara gratis :
1. Yahoo! Search
http://search.yahoo.com/info/submit.html
2. Google
http://www.google.com/addurl/?continue=/addurl
3. Live Search
http://search.msn.com/docs/submit.aspx
4. Dmoz Directory
http://www.dmoz.org/add.html
5. Exalead
http://www.exalead.com/search/C=0?definition=submitYourSitePage
6. MavicaNet
http://www.mavicanet.com/
7. ScrubTheWeb
http://www.scrubtheweb.com/addurl.html
8. Wikia Search
http://re.search.wikia.com/
9. World Site Index
http://www.worldsiteindex.com/
10. Cuil
http://www.cuil.com/info/contact_us/feedback/?to=crawl%20me
11. What U Seek
http://www.whatuseek.com/addurl-secondary.shtml
12. ExactSeek
http://www.exactseek.com/add.html
13. BusinessSeek
http://www.businessseek.biz/page.php?page=submission-policy
14. EntireWeb
http://www.entireweb.com/free_submission/
15. SearchMe
http://www.searchme.com/support/submit.php
16. IllumiRate
http://www.illumirate.com/add_your_site_exp.cfm
17. 01WebDirectory
http://www.01webdirectory.com/submit.htm
18. Amfibi
http://addurl.amfibi.com/
19. SearchSight
http://searchsight.com/submit.htm
20. WebbieWorld
http://www.webbieworld.com/signup.asp
21. Web Linker
http://www.wlinker.com/add_submit_url
22. NetInsert
http://www.netinsert.com/en/insert.html
23. SonicRun
http://search.sonicrun.com/add
24. Thales Directory
http://www.thalesdirectory.com/submit.php
25. Link Centre
http://www.linkcentre.com/addurl.html
Cara Setting GPRS Dan MMS Pada Operator GSM
KARTU HALLO
Setting Melalui SMS
Kirim SMS ke 6616 dengan pesan :
Ketik : GPRS
KARTU SIMPATI/KARTU AS
Setting Melalui SMS
Kirim SMS ke 6616 dengan pesan :
Ketik : GPRS[spasi]angka dibelakang simcard Anda (Nomor ICCID/Integrated Circuit Card Identification)
Setting Manual GPRS
Profile Name : TSEL GPRS
APN : Telkomsel
User name : wap
Password : wap123
Authentication : Normal
Gateway IP address : 10.1.89.130
Homepage : http://wap.telkomsel.com
Data Bearer : GPRS
Proxy port number : 9201 atau 8000
Setting Manual MMS
Connection Name: tel-MMS
Data Bearer: GPRS
Access Point Name: mms
Username: wap
Prompt Password: No
Password: wap123
Authentication: Normal
Proxy address: 10.1.89.150
Homepage: http://mms.telkomsel.com/
Connection Security: Off
KARTU MATRIX
Setting Melalui SMS
Kirim SMS ke 888 dengan pesan :
ACT[spasi]GPRS
KARTU MENTARI
Setting Melalui SMS
Kirim SMS ke 3000 dengan pesan :
Ketik : GPRS[spasi] merk HP[spasi] tipe HP
Setting Manual GPRS
Profile Name : INDOSATGPRS
Homepage URL : http://wap.klub-mentari.com
IP Address : 10.19.19.19
Bearer : GPRS
User Name : indosat
Password : indosat
APN : indosatgprs
Setting Manual MMS
Profile Name : INDOSATGPRS
Homepage URL : http://mmsc.indosat.com
IP Address : 10.19.19.19:8080
Bearer : GPRS
User Name : indosat
Password : indosat
APN : indosatmms
KARTU IM3
Setting Melalui SMS
Kirim SMS ke 3939 dengan pesan :
Ketik : GPRS[spasi] merk HP[spasi] tipe HP
Setting Manual GPRS
Connection name : M3-GPRS
Access point name : www.indosat-m3.net
User name : gprs
Password : im3
Authentication : Normal
Homepage : http://wap.indosat-m3.net
IP address : 010.019.019.019
Port : 9201 (standard), 8080 (proxy)
Setting Manual MMS
Connection name : M3-MMS
Access point name : indosatmms
User name : indosatmms
Password : indosatmms
Authentication : Normal
Homepage : http://mmsc.indosat-m3.net
IP address : 010.019.019.019
Port : 9201 (standard), 8080 (proxy)
KARTU XL
Setting Melalui SMS
Ketik SMS dengan isi : GPRS[spasi][spasi] Kirim ke 9667
Ketik SMS dengan isi : MMS[spasi][spasi] Kirin ke 9667
Setting Manual GPRS
Connection Name: XL-GPRS
Data Bearer: GPRS
Access Point Name: www.xlgprs.net
Username: xlgprs
Prompt Password: No
Password: proxl
Authentication: Normal
Homepage: http://wap.lifeinhand.com
Connection Security: Off
Session Mode: Permanent
IP Address: Automatic
Proxy Server Address: 202.152.240.050
Proxy Port Number: 8080
Setting Manual MMS
Connection Name: XL-MMS
Data Bearer: GPRS
Access Point Name: www.xlmms.net
Username: xlgprs
Prompt Password: No
Password: proxl
Authentication: Normal
Homepage: http://mmc.xl.net.id/servlets/mms
Connection Security: Off
Session Mode: Permanent
IP Address: Automatic
Proxy Server Address: 202.152.240.050
Proxy Port Number: 8080
KARTU 3(THREE)
Setting Manual GPRS
Settings Name: 3-GPRS
Homepage : http://wap.three.co.id/
Proxies : Enable
Proxy address : 10.4.0.10
Port : 3128
GPRS access point : 3gprs
Authentication type : Normal
Login type : Automatic
Username : 3gprs
Password : 3gprs
Setting Manual MMS
Settings name : 3-MMS
Homepage : http://mms.hutch.co.id/
GPRS access point : 3mms
Authentication type : Normal
Username : 3mms
Password : 3mms
Allow adverts : No
KARTU AXIS
Setting Manual GPRS
Connection Name : AXIS
Data Bearer : GPRS atau PS
Access Point Name (APN) : AXIS
Username : AXIS
Prompt Password : No
Password : 123456
Authentication : Normal
Gateway/Proxy IP Address : 10.8.3.8
Gateway/Proxy Port : 9201 atau 8080
Homepage : http://wap.axisworld.co.id
Connection Security : Off
Session Mode : Permanent
Setting Manual MMS
Connection Name : AXISmms
Data Bearer : GPRS atau PS
Access Point Name (APN) : AXISmms
Username : AXIS
Prompt Password : No
Password : 123456
Authentication : Normal
Gateway/Proxy IP Address : 10.8.3.8
Gateway/Proxy Port : 9201 atau 8080
Homepage / MMS Server : http://mmsc.AXIS
Connection Security : Off
Session Mode : Permanent
Setting Melalui SMS
Kirim SMS ke 6616 dengan pesan :
Ketik : GPRS
KARTU SIMPATI/KARTU AS
Setting Melalui SMS
Kirim SMS ke 6616 dengan pesan :
Ketik : GPRS[spasi]angka dibelakang simcard Anda (Nomor ICCID/Integrated Circuit Card Identification)
Setting Manual GPRS
Profile Name : TSEL GPRS
APN : Telkomsel
User name : wap
Password : wap123
Authentication : Normal
Gateway IP address : 10.1.89.130
Homepage : http://wap.telkomsel.com
Data Bearer : GPRS
Proxy port number : 9201 atau 8000
Setting Manual MMS
Connection Name: tel-MMS
Data Bearer: GPRS
Access Point Name: mms
Username: wap
Prompt Password: No
Password: wap123
Authentication: Normal
Proxy address: 10.1.89.150
Homepage: http://mms.telkomsel.com/
Connection Security: Off
KARTU MATRIX
Setting Melalui SMS
Kirim SMS ke 888 dengan pesan :
ACT[spasi]GPRS
KARTU MENTARI
Setting Melalui SMS
Kirim SMS ke 3000 dengan pesan :
Ketik : GPRS[spasi] merk HP[spasi] tipe HP
Setting Manual GPRS
Profile Name : INDOSATGPRS
Homepage URL : http://wap.klub-mentari.com
IP Address : 10.19.19.19
Bearer : GPRS
User Name : indosat
Password : indosat
APN : indosatgprs
Setting Manual MMS
Profile Name : INDOSATGPRS
Homepage URL : http://mmsc.indosat.com
IP Address : 10.19.19.19:8080
Bearer : GPRS
User Name : indosat
Password : indosat
APN : indosatmms
KARTU IM3
Setting Melalui SMS
Kirim SMS ke 3939 dengan pesan :
Ketik : GPRS[spasi] merk HP[spasi] tipe HP
Setting Manual GPRS
Connection name : M3-GPRS
Access point name : www.indosat-m3.net
User name : gprs
Password : im3
Authentication : Normal
Homepage : http://wap.indosat-m3.net
IP address : 010.019.019.019
Port : 9201 (standard), 8080 (proxy)
Setting Manual MMS
Connection name : M3-MMS
Access point name : indosatmms
User name : indosatmms
Password : indosatmms
Authentication : Normal
Homepage : http://mmsc.indosat-m3.net
IP address : 010.019.019.019
Port : 9201 (standard), 8080 (proxy)
KARTU XL
Setting Melalui SMS
Ketik SMS dengan isi : GPRS[spasi][spasi] Kirim ke 9667
Ketik SMS dengan isi : MMS[spasi][spasi] Kirin ke 9667
Setting Manual GPRS
Connection Name: XL-GPRS
Data Bearer: GPRS
Access Point Name: www.xlgprs.net
Username: xlgprs
Prompt Password: No
Password: proxl
Authentication: Normal
Homepage: http://wap.lifeinhand.com
Connection Security: Off
Session Mode: Permanent
IP Address: Automatic
Proxy Server Address: 202.152.240.050
Proxy Port Number: 8080
Setting Manual MMS
Connection Name: XL-MMS
Data Bearer: GPRS
Access Point Name: www.xlmms.net
Username: xlgprs
Prompt Password: No
Password: proxl
Authentication: Normal
Homepage: http://mmc.xl.net.id/servlets/mms
Connection Security: Off
Session Mode: Permanent
IP Address: Automatic
Proxy Server Address: 202.152.240.050
Proxy Port Number: 8080
KARTU 3(THREE)
Setting Manual GPRS
Settings Name: 3-GPRS
Homepage : http://wap.three.co.id/
Proxies : Enable
Proxy address : 10.4.0.10
Port : 3128
GPRS access point : 3gprs
Authentication type : Normal
Login type : Automatic
Username : 3gprs
Password : 3gprs
Setting Manual MMS
Settings name : 3-MMS
Homepage : http://mms.hutch.co.id/
GPRS access point : 3mms
Authentication type : Normal
Username : 3mms
Password : 3mms
Allow adverts : No
KARTU AXIS
Setting Manual GPRS
Connection Name : AXIS
Data Bearer : GPRS atau PS
Access Point Name (APN) : AXIS
Username : AXIS
Prompt Password : No
Password : 123456
Authentication : Normal
Gateway/Proxy IP Address : 10.8.3.8
Gateway/Proxy Port : 9201 atau 8080
Homepage : http://wap.axisworld.co.id
Connection Security : Off
Session Mode : Permanent
Setting Manual MMS
Connection Name : AXISmms
Data Bearer : GPRS atau PS
Access Point Name (APN) : AXISmms
Username : AXIS
Prompt Password : No
Password : 123456
Authentication : Normal
Gateway/Proxy IP Address : 10.8.3.8
Gateway/Proxy Port : 9201 atau 8080
Homepage / MMS Server : http://mmsc.AXIS
Connection Security : Off
Session Mode : Permanent
Langganan:
Postingan (Atom)